[2023 version] Create and manage employees' contract
Main contents:
A. Create contract templates (Details)
1. The system data fields that can be automatically filled in the contract once they have been uploaded to terra (Details)
B. Create labor contracts for employees (Details)
C. Manage created contracts status (Details)
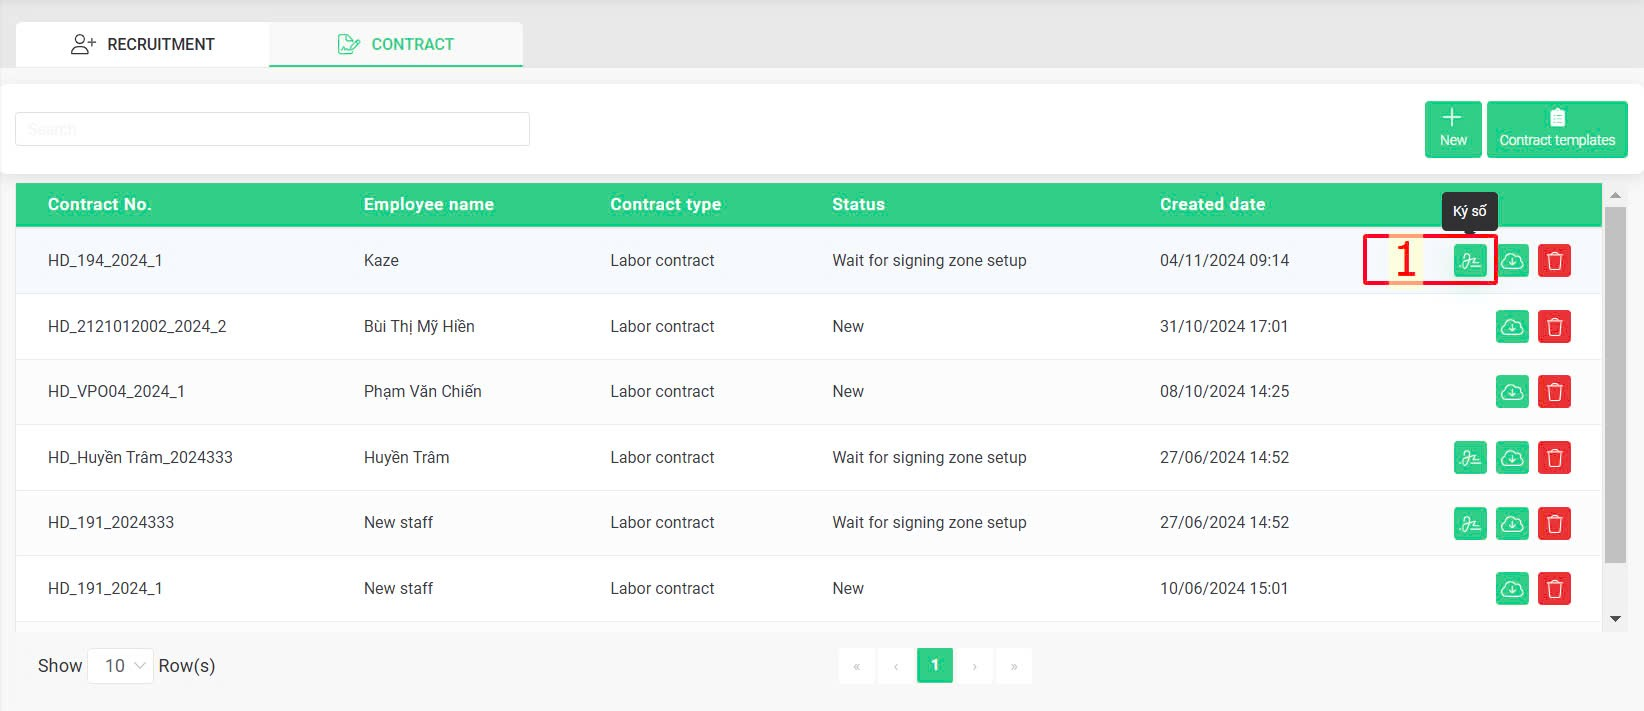
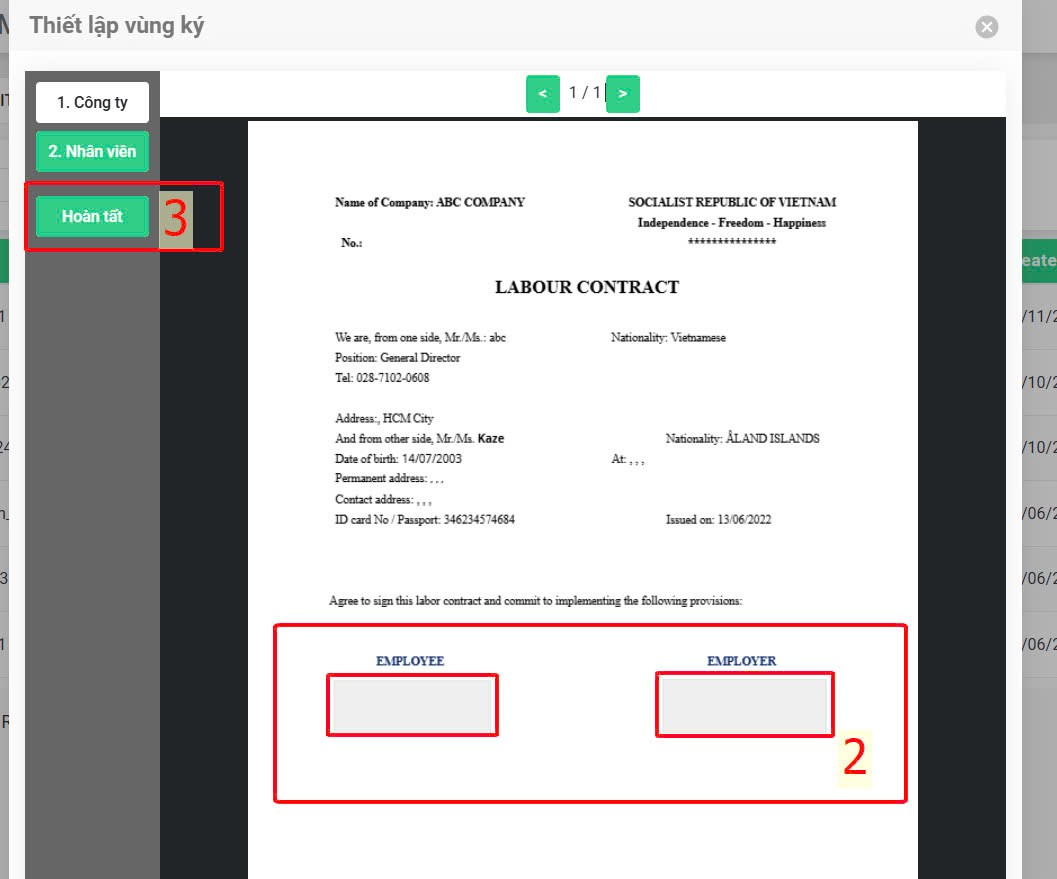
1. Set up the digital signing zone (Details)
Authorized accounts can create contract templates according to company policy and then use these templates to generate contracts for each employee based on available information. Once the contract creation is complete, managers can manage contract status and make necessary adjustments if there are errors in employee information.
A. Create contract templates
Step 1: Create the company's contract template
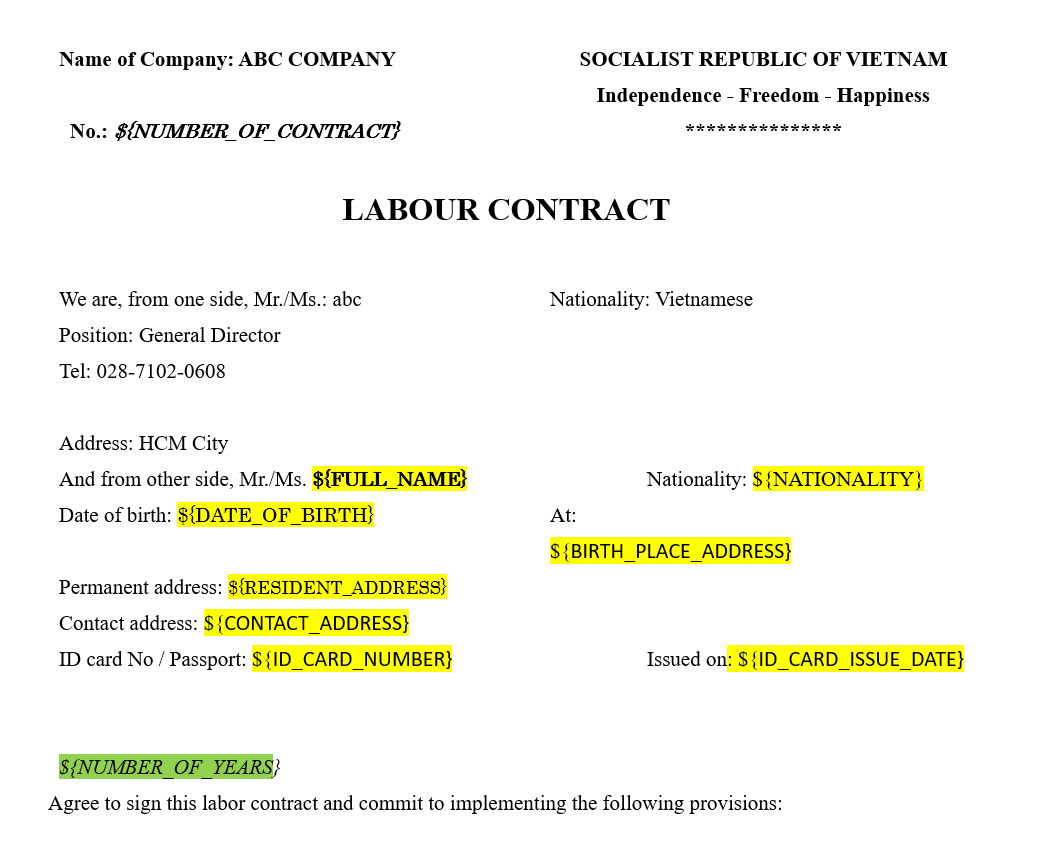
Create the company's contract template > Fill in the data fields that will change for each employee using the syntax ${field name}.
Contract template sample file:
Note:
-
When the employee's basic and salary information is uploaded to terra, the system automatically fills in the corresponding data fields in the contract. For data fields not available on terra, managers or authorized accounts can manually enter the information directly into the employee's contract during the contract creation step.
-
The system data fields can be automatically filled in the contract once they have been uploaded to terra:
Information |
Data field name(The system will only automatically fill each employee's contract if the correct name is entered.) |
Full name |
FULL_NAME |
Employee ID |
CODE |
Probation start date |
PROBATION_START_DATE |
Probation end date |
PROBATION_END_DATE |
Contract signing date |
OFFICIAL_CONTRACT_SIGNING_DATE |
Contract type |
TYPE_OF_EMPLOYMENT_CONTRACT |
Salary |
SALARY |
Responsibility allowance |
ALLOWANCE_FOR_RESPONSIBILITIES |
Fixed allowance |
FIXED_ALLOWANCE |
Tax subject |
IS_TAX_APPLICABLE |
Target payer of insurance |
IS_INSURANCE_APPLICABLE |
Number of dependents |
NUMBER_OF_DEPENDENTS |
Bank account |
BANK_ACCOUNT |
Account number |
BANK_ACCOUNT_NUMBER |
Bank name |
BANK_NAME |
Branch name |
BANK_BRANCH |
Social insurance number |
SOCIAL_INSURANCE_NUMBER |
Date of birth |
DATE_OF_BIRTH |
Sex |
SEX |
Department |
DEPARTMENT |
Position |
POSITION |
Title |
TITLE |
Workplace |
WORKPLACE |
Marital status |
MARITAL_STATUS |
Salary for social insurance payment |
SALARY_FOR_SOCIAL_INSURANCE_PAYMENT |
Social insurance effective date |
EFFECTIVE_DATE_OF_SOCIAL_INSURANCE |
Medical care hospital name |
MEDICAL_CARE_HOSPITAL_NAME |
Medical care hospital code |
MEDICAL_CARE_HOSPITAL_CODE |
Nationality |
NATIONALITY |
Nation |
NATION |
ID card number |
ID_CARD_NUMBER |
ID card issue date |
ID_CARD_ISSUE_DATE |
ID card issue place |
ID_CARD_ISSUE_PLACE |
Birthplace address |
BIRTH_PLACE_ADDRESS |
House number, street, village |
BIRTH_PLACE_STREET |
Birthplace ward |
BIRTH_PLACE_WARDS |
Birthplace district |
BIRTH_PLACE_DISTRICT |
Birthplace city/province |
BIRTH_PLACE_CITY_PROVINCE |
Resident address |
RESIDENT_ADDRESS |
House number, street, village |
RESIDENT_STREET |
Resident ward |
RESIDENT_WARDS |
Resident district |
RESIDENT_DISTRICT |
Resident city/province |
RESIDENT_CITY_PROVINCE |
Contact address |
CONTACT_ADDRESS |
House number, street, village |
CONTACT_STREET |
Contact ward |
CONTACT_WARDS |
Contact district |
CONTACT_DISTRICT |
Contact city/province |
CONTACT_CITY_PROVINCE |
Contact phone number |
CONTACT_PHONE_NUMBER |
Household head information |
HOUSEHOLD_HEAD_INFO |
Household code |
HOUSEHOLD_CODE |
Household head full name |
HOUSEHOLD_HEAD_FULLNAME |
Household head ID card number |
HOUSEHOLD_HEAD_ID_CARD_NUMBER |
Household head date of birth |
HOUSEHOLD_HEAD_DATE_OF_BIRTH |
Household head relation |
HOUSEHOLD_HEAD_RELATION |
Household headphone |
HOUSEHOLD_HEAD_PHONE |
Resident record number |
RESIDENT_RECORD_NUMBER |
Resident record type |
RESIDENT_RECORD_TYPE |
Resident village |
RESIDENT_VILLAGE |
Resident commune/ward/district/province |
RESIDENT_COMMUNE_WARD_DISTRICT_PROVINCE |
Status |
STATUS |
Quitted date |
QUITTED_AT |
Created date |
CREATED_AT |
Updated date |
UPDATED_AT |
Deleted date |
DELETED_AT |
Account role |
ROLE |
Foreigner job position |
FOREIGNER_JOB_POSITION |
Foreigner contract status |
FOREIGNER_CONTRACT_STATUS |
Education level |
EDUCATION_LEVEL |
PIT code |
MST_CODE |
Step: Fill in the detailed information of the contract template
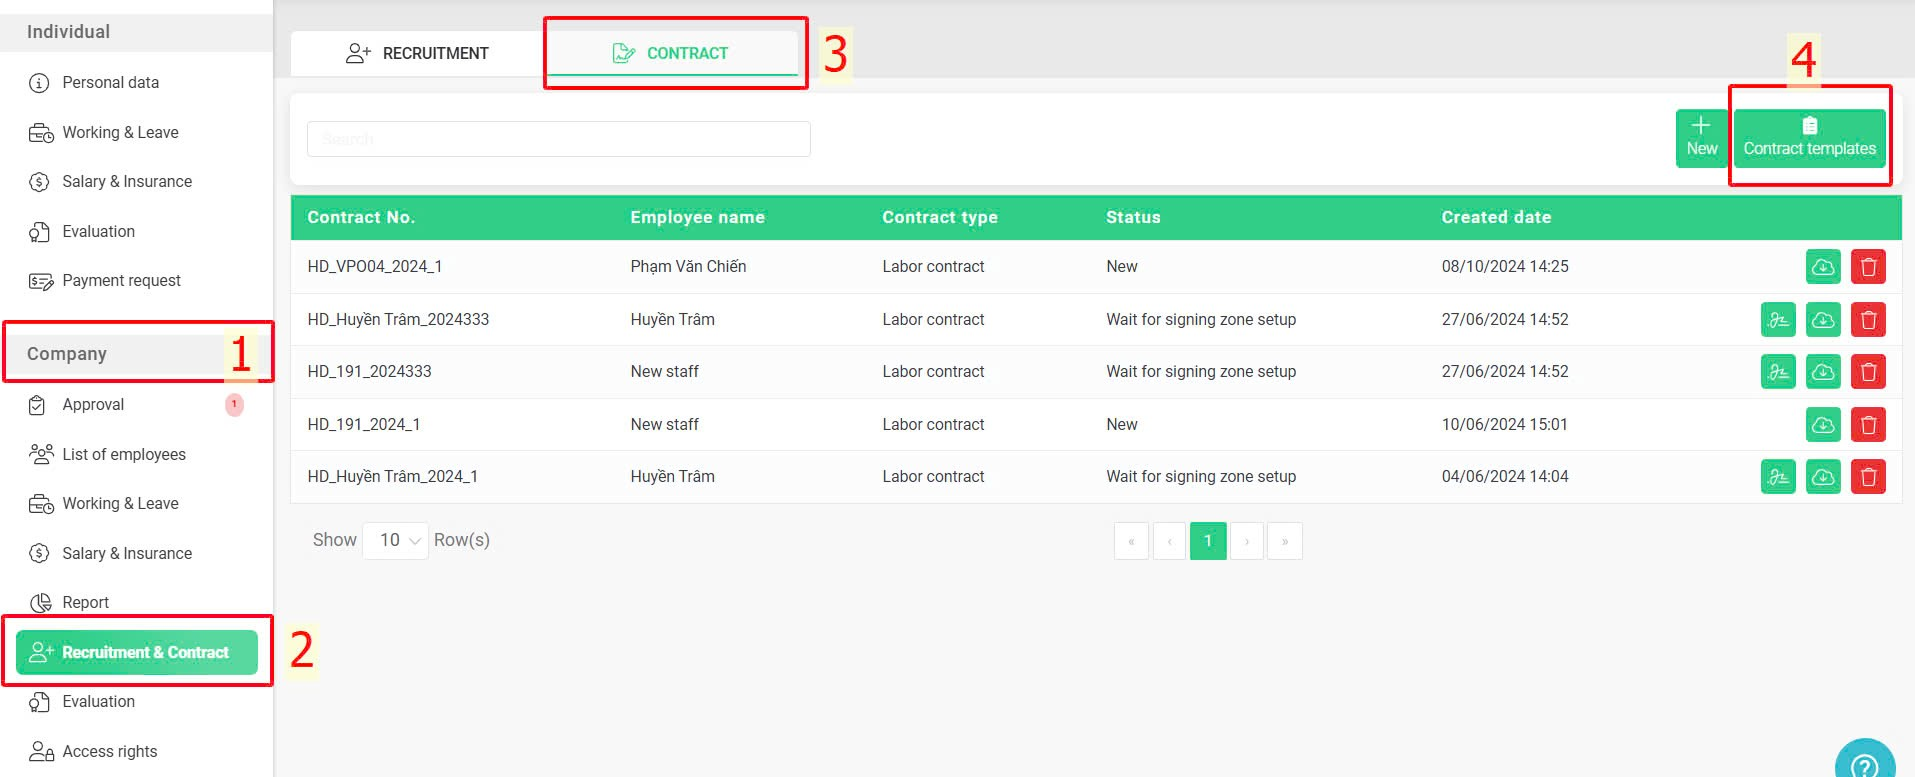
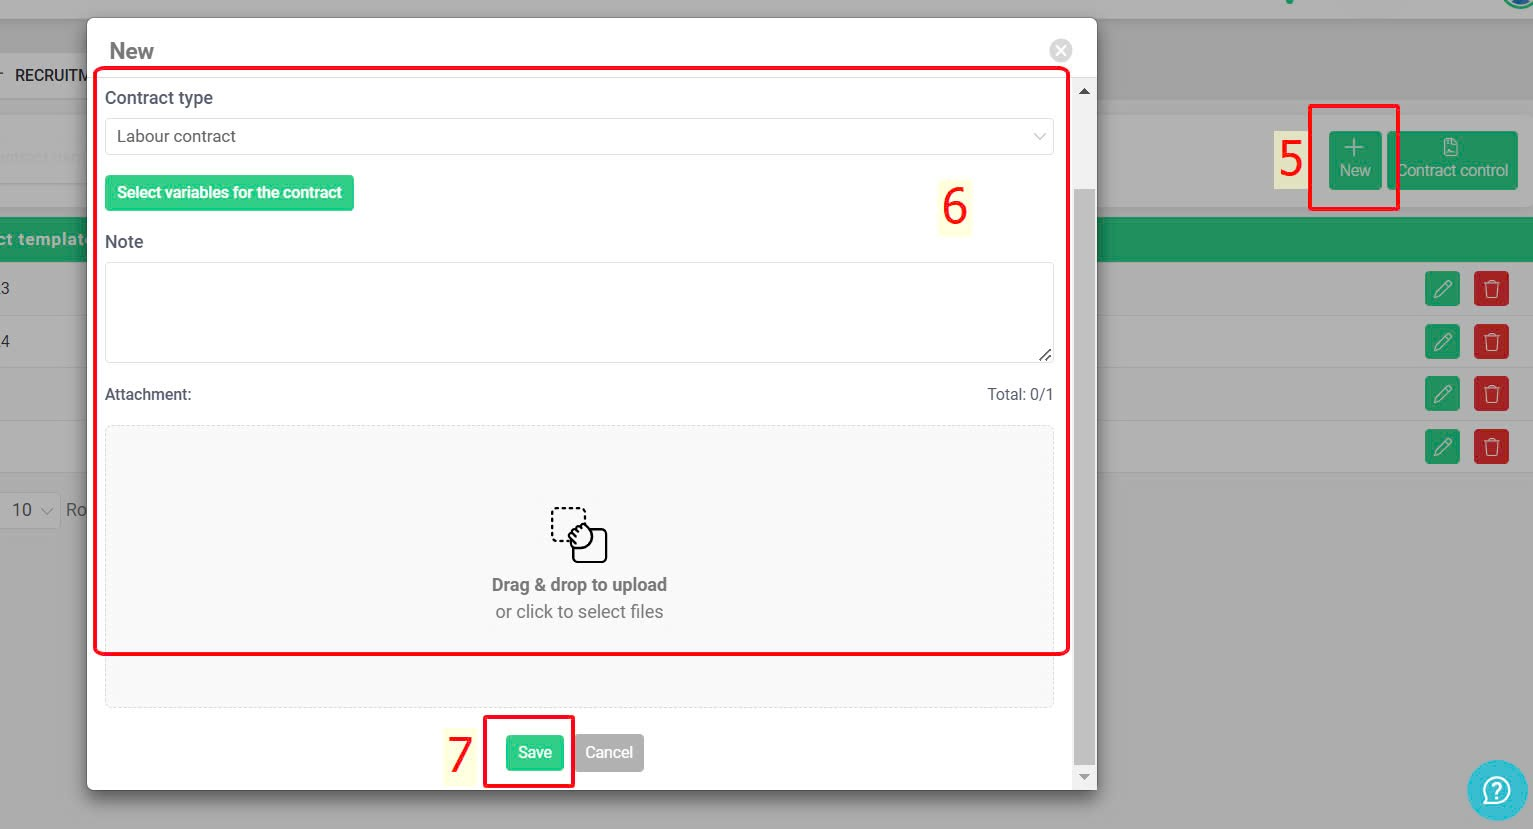
Company > Recruitment & Contract > Contract > Contract templates > New > Fill in the information of the contract template > Upload the template created in step 1 > Save
Annotation:
Glossary |
Explanation |
Contract template name |
Enter the contract template name to differentiate |
Contract type |
Include 2 types:
|
Select the available data fields in the system that have been filled in the template created in Step 1 |
|
Note |
Add notes for the contract template (if any) |
Attachment |
Upload the template file created in Step 1 to the system |
Note:
-
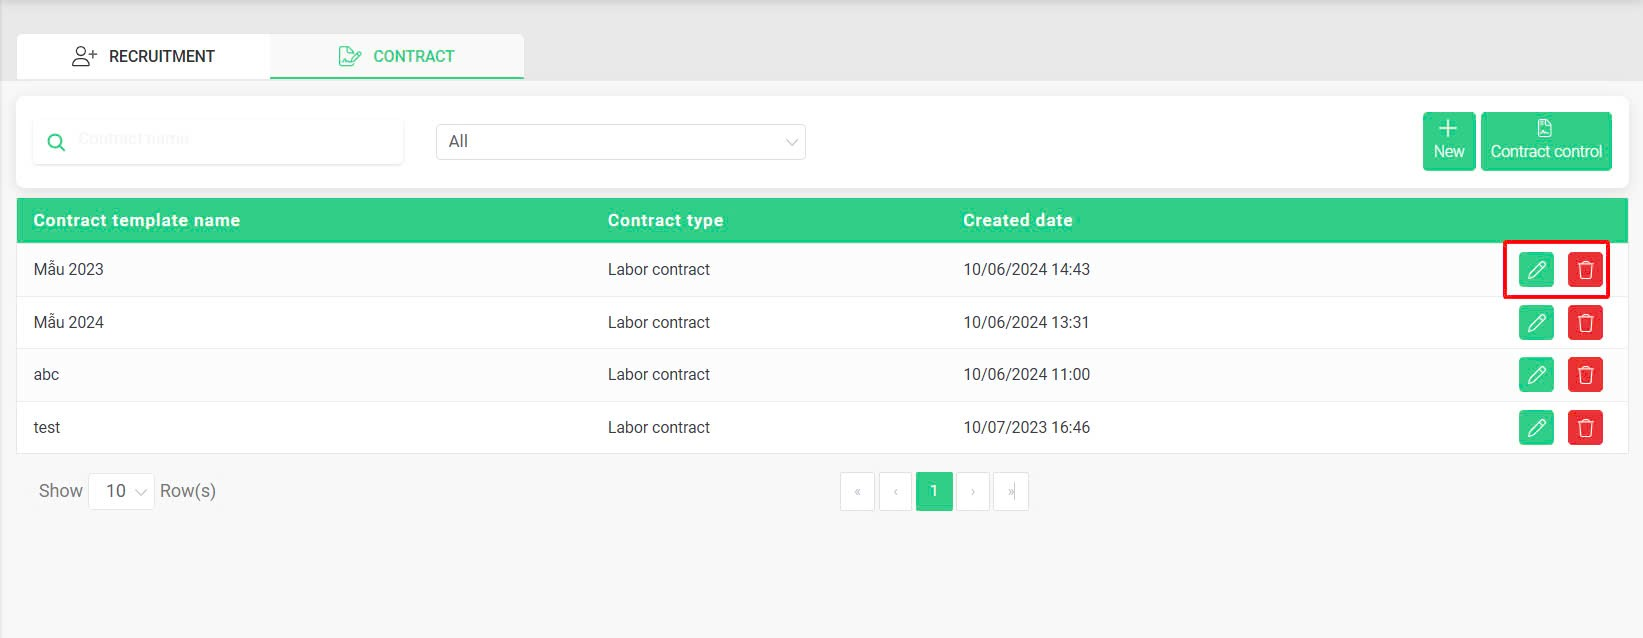
The created contract templates will be displayed on the summary screen & admin or authorized account can edit or delete the templates if needed.
B. Create labour contracts for employees
Once a contract template is available, authorized accounts can create detailed contracts for each employee based on the information available in the system, with additional fields manually filled in as follows.
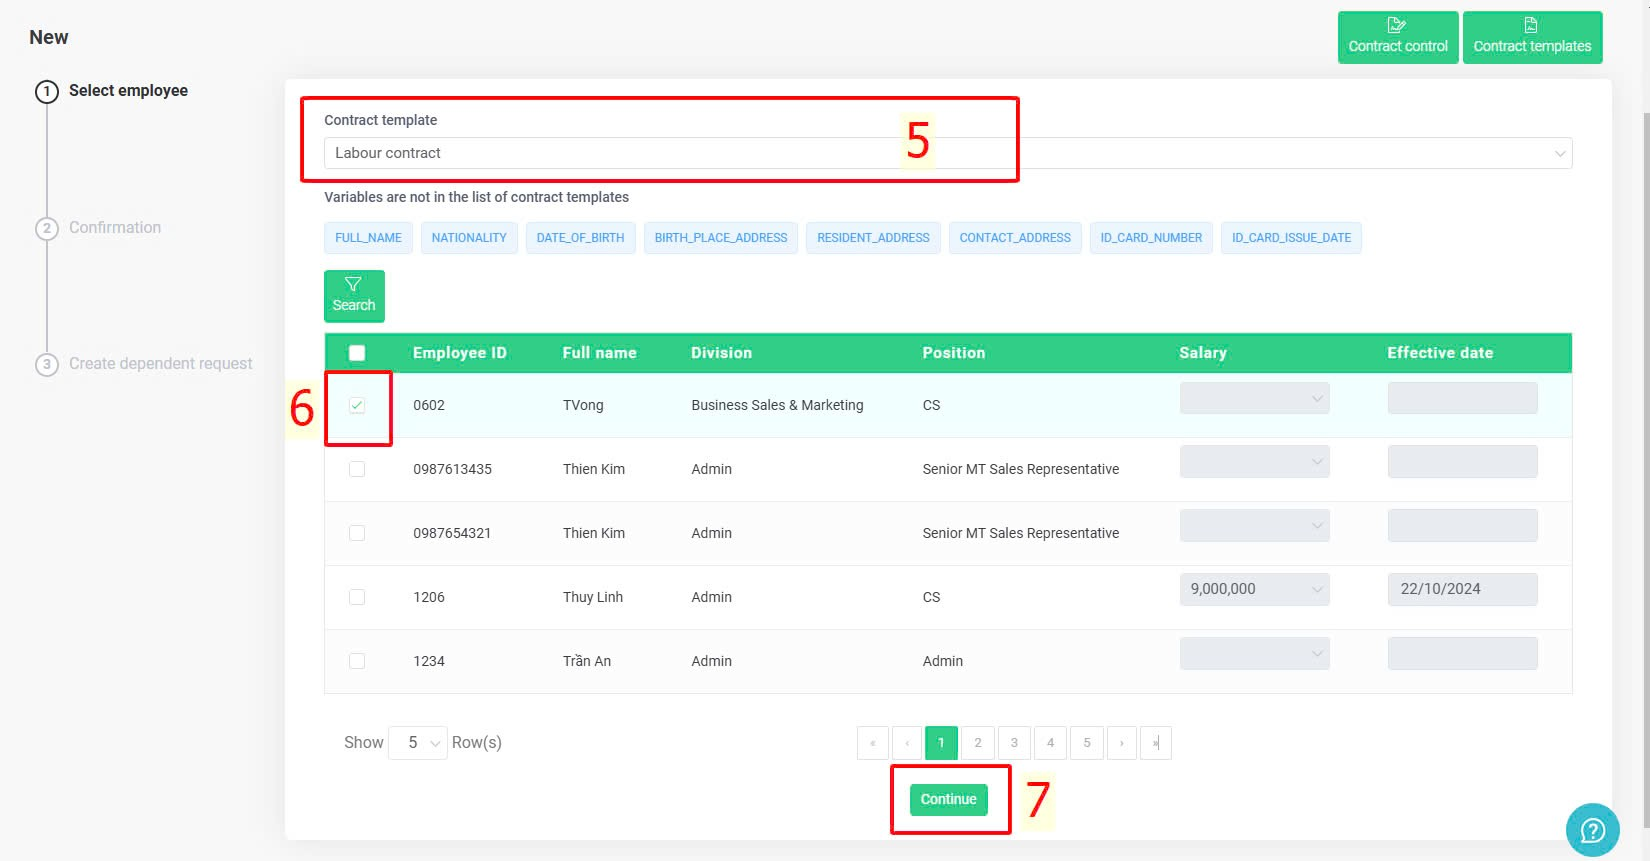
Step 1: Select the contract template and choose the employee to create the contract
Company > Recruitment & Contract > Contract > New > Select the appropriate contract template > Select the employee to create the contract > Continue
Note:
-
The information fields added to the contract template that are not available in the system will be listed on this screen:
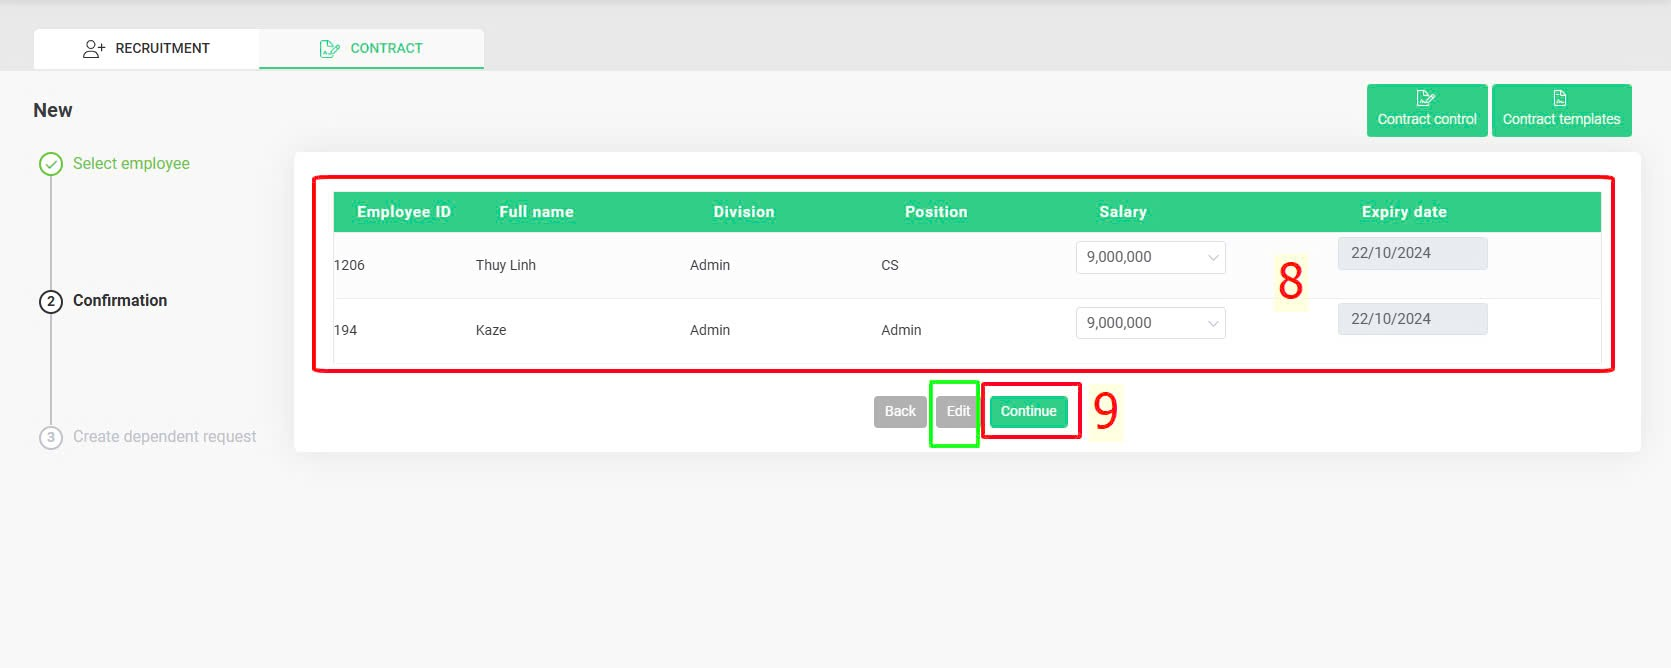
Step 2: Confirm the employee for contract creation
Review the selected employee > [Edit] to choose the correct salary range from the created salary histories > Continue
Note:
-
When clicking the "Edit" button, authorized accounts can select the created salary histories to display the correct salary level to be included in the employee's contract.
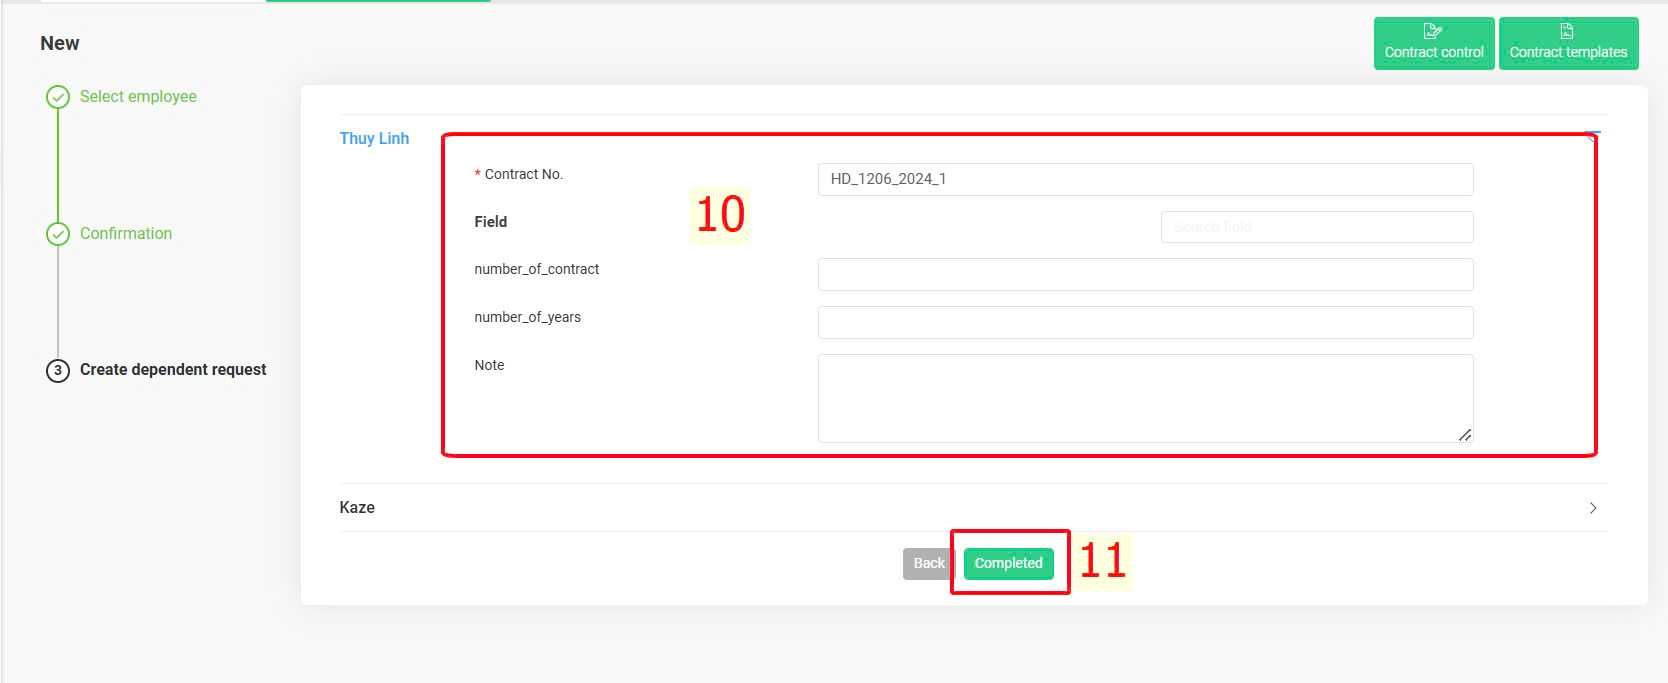
Step 3: Fill in the information not available in the system
Icon  > Fill in the information for the data fields not available in the system for each employee > Completed
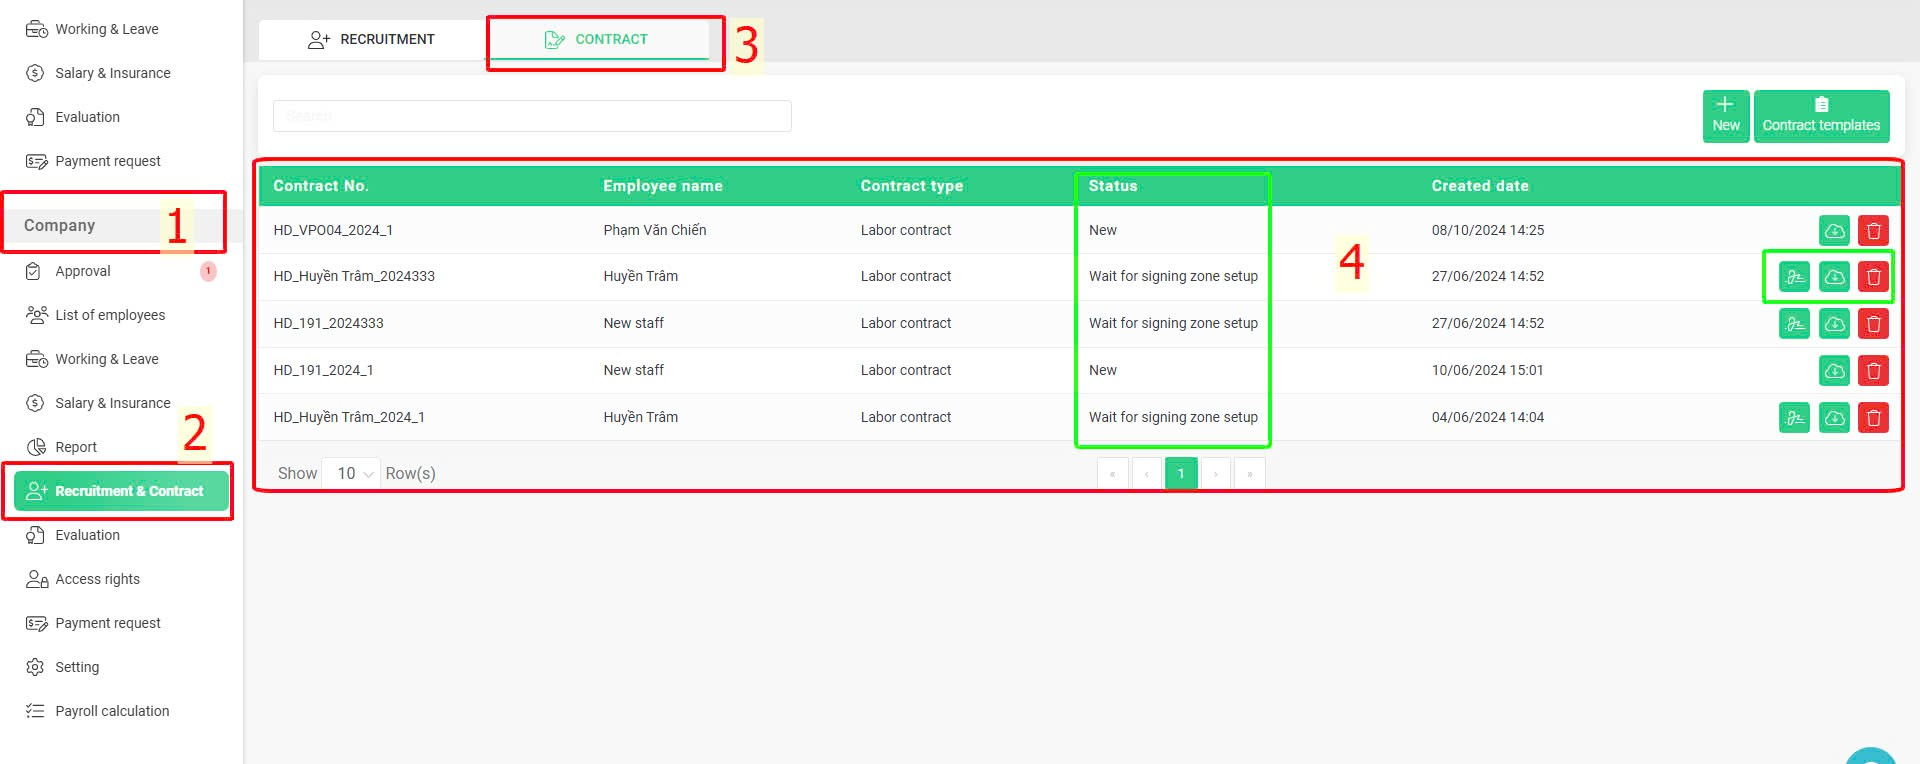
C. Manage created contracts status
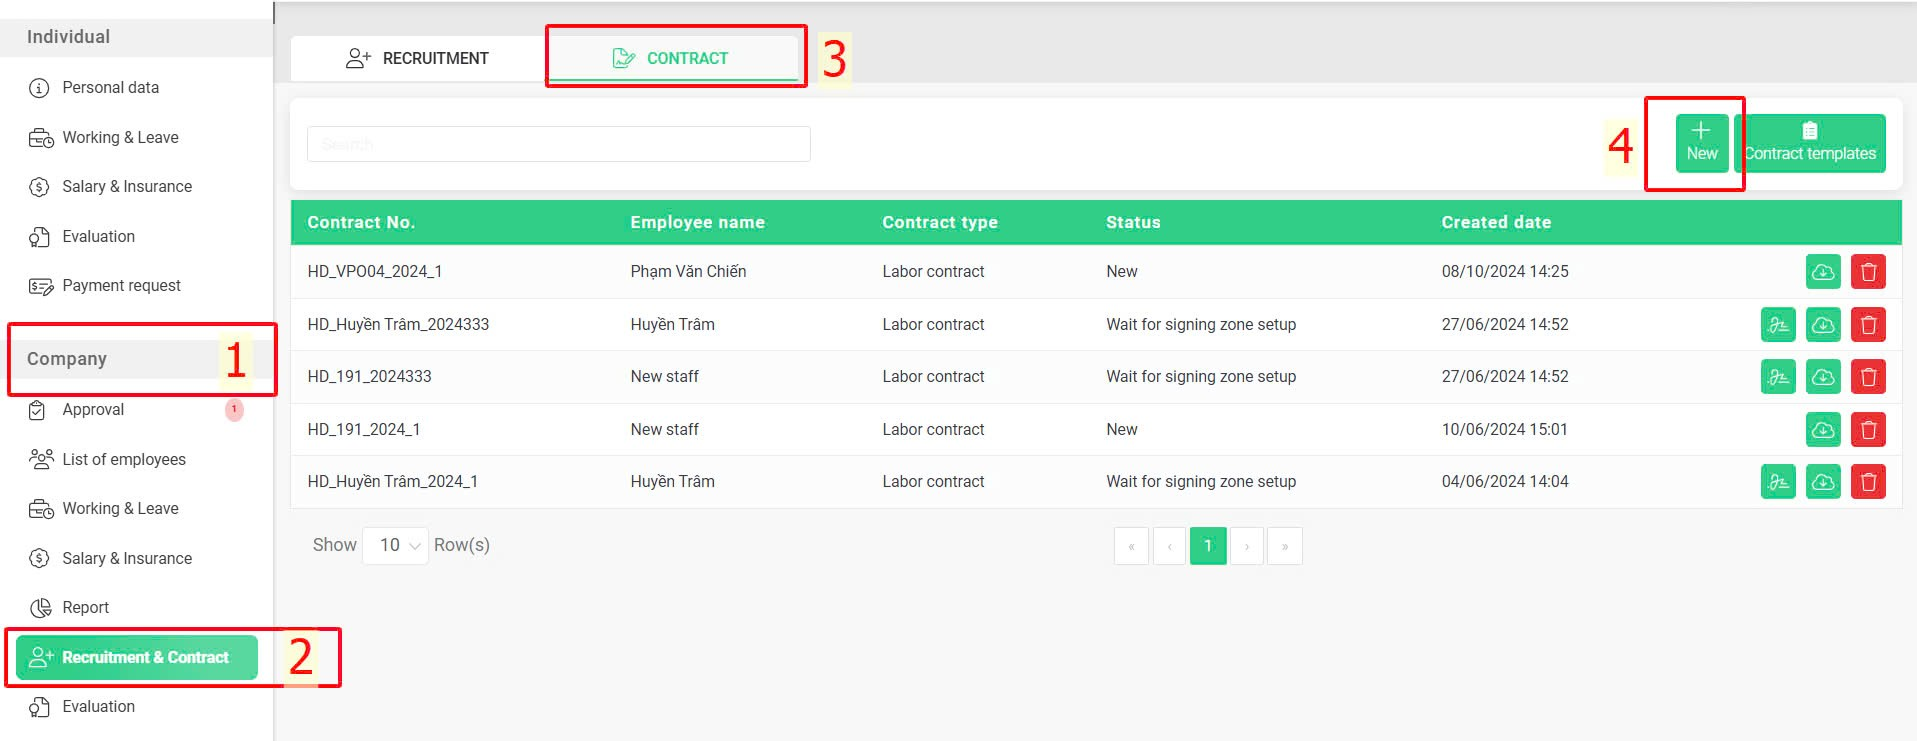
Authorized accounts can manage the status of created contracts by following these steps:
Steps:
Company > Recruitment & Contract > Contract
Annotation:
Lưu ý:
-
After the employee has confirmed the contract, authorized accounts can set up the digital signature field by performing the following actions


