Nhảy đến nội dung chính
[2023 Version] Configure request's time limit
Main contents:
A. Direct configuration on the system
-
Configuration for the Entire Company (Details)
-
Configuration for Each Employee (Details)
B. Configuration via Excel file import (Details)
C. View requested time and remaining limit (Details)
terra allows authorized accounts or admin to set specific time limits for different types of requests.
This setting can be applied uniformly across the company or customized individually for each employee.
Note:
-
This feature applies calendar days (from 01/01 to 31/12), not based on the working calendar.
-
Time limits cannot be applied to annual leave requests.
-
Other paid requests and other unpaid requests are configured in the same setting
-
The Overtime/Compensation working hours limit is set in line with the Overtime/Compensation working allocation hours limit.
A. Direct configuration on the system
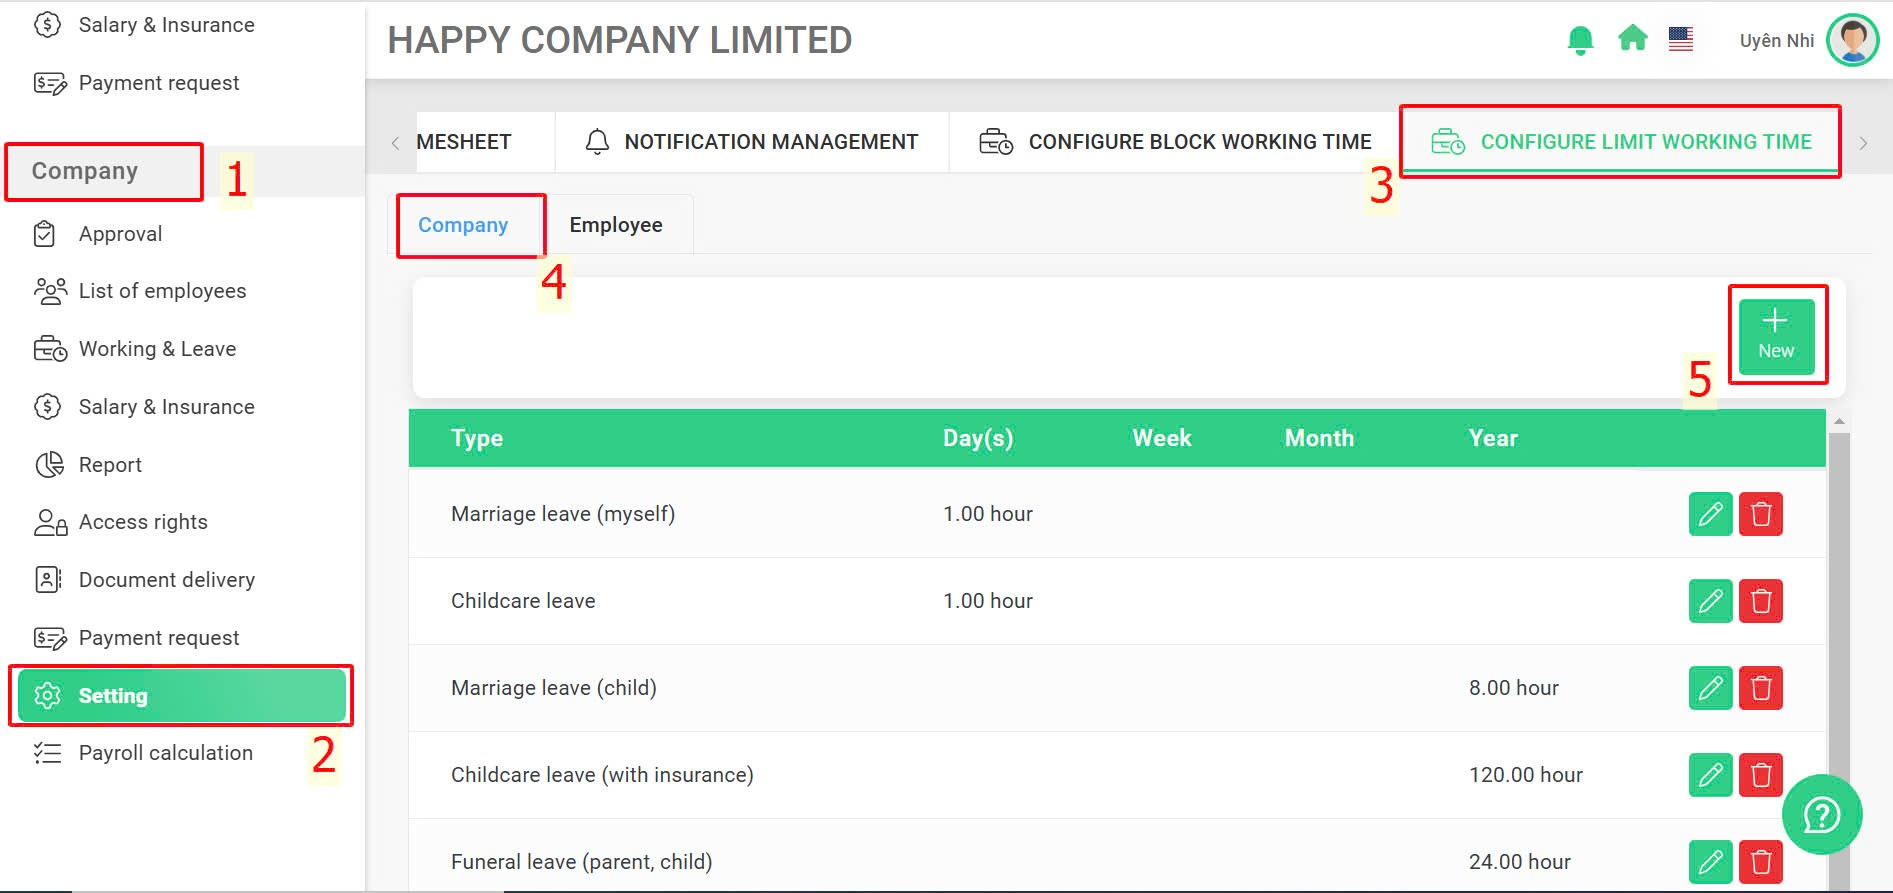
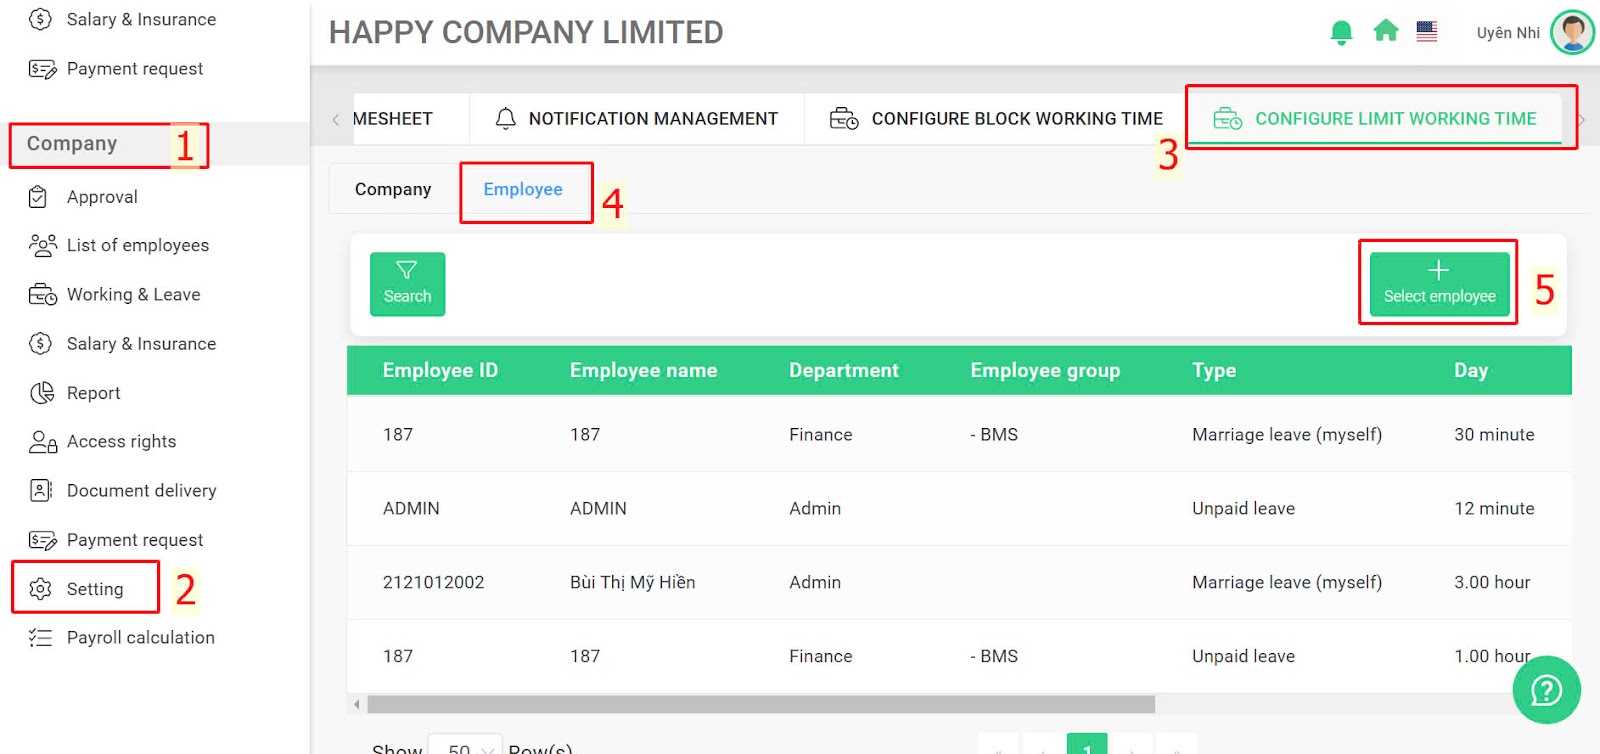
1. Configuration for the Entire Company
Steps:
Company > Settings > Configure limit working time > Company Tab > Add New > Select the request type to configure > Enter the desired minute or hour limit for each section > Confirm

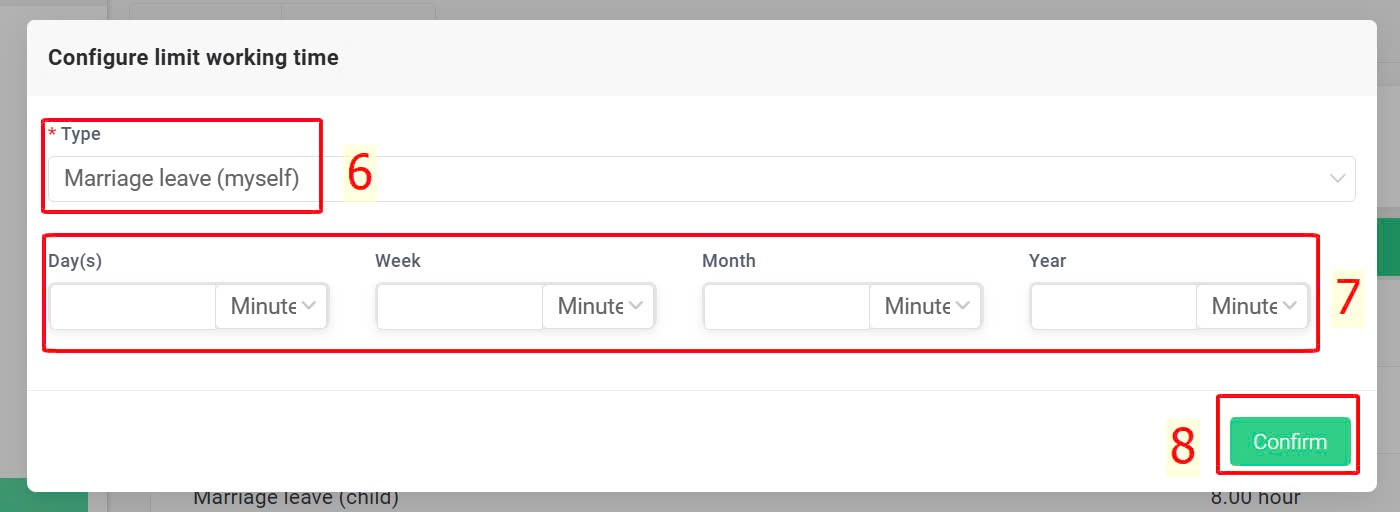
Note:
-
Any field left blank will not apply the time limit for the request.
-
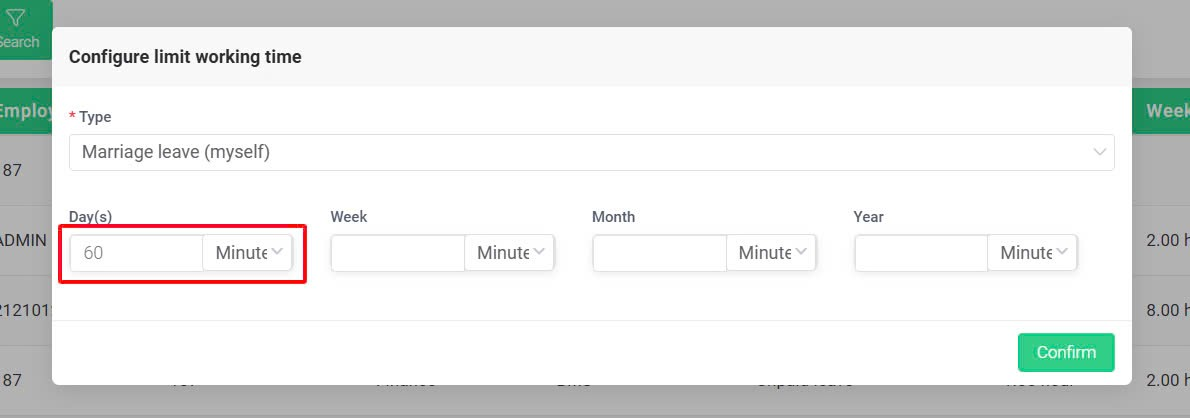
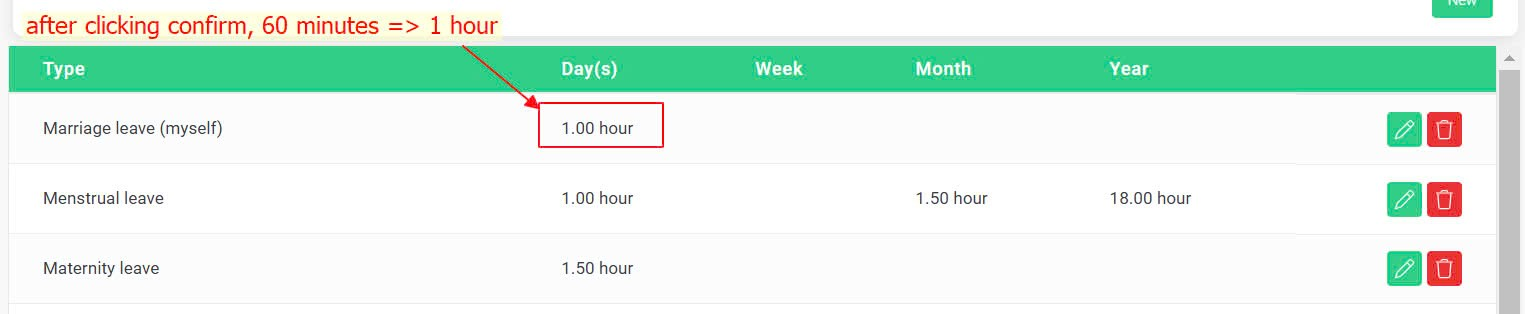
When the unit is set to "minute", if the number of "minute" is entered >= 60, the system will automatically transfer it to "hour" after confirmation.
-
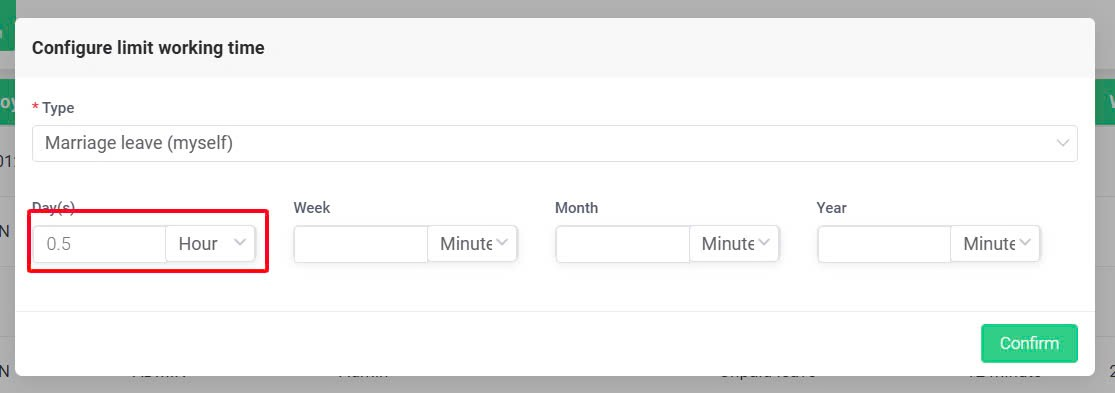
When the unit is set to "hour", if the entered hour is < 1, the system will automatically transfer it to "minute" after confirmation.

-
Click on the symbol  or
or  to edit or delete the setting of the time limit.

-
In addition to the available types of requests in the system, the requests created by the admin or authorized account can also be set up on this screen.
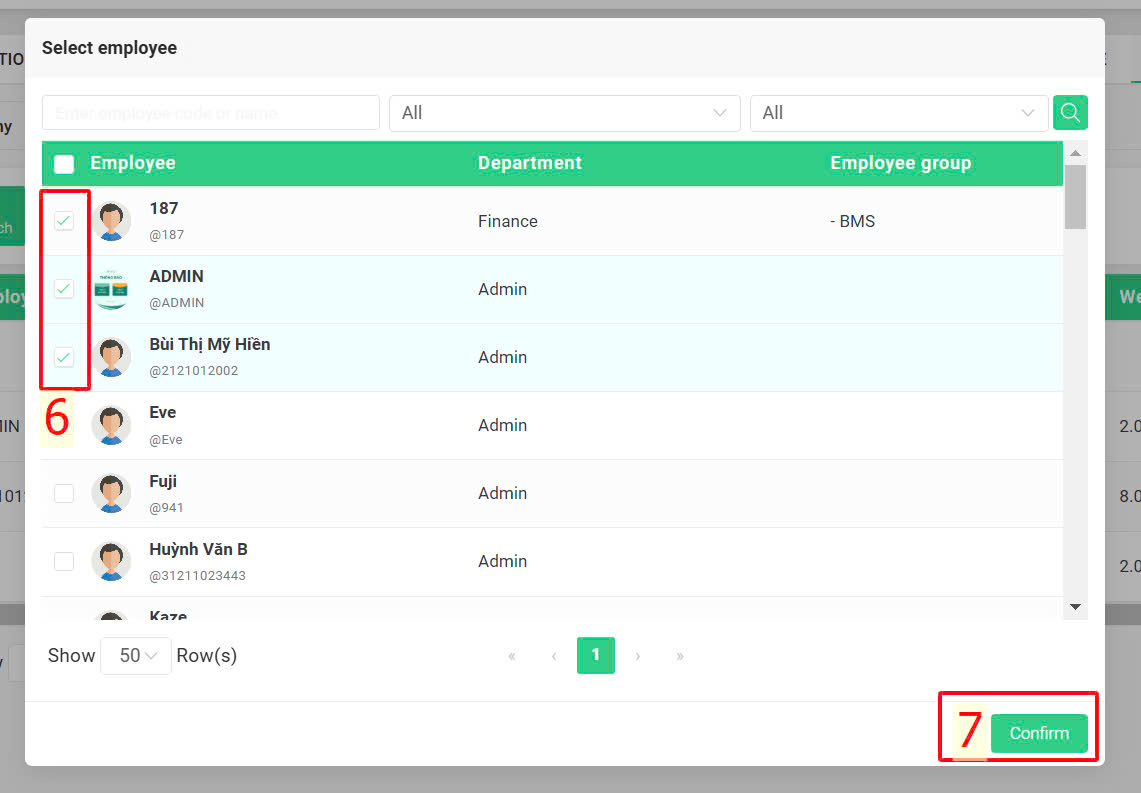
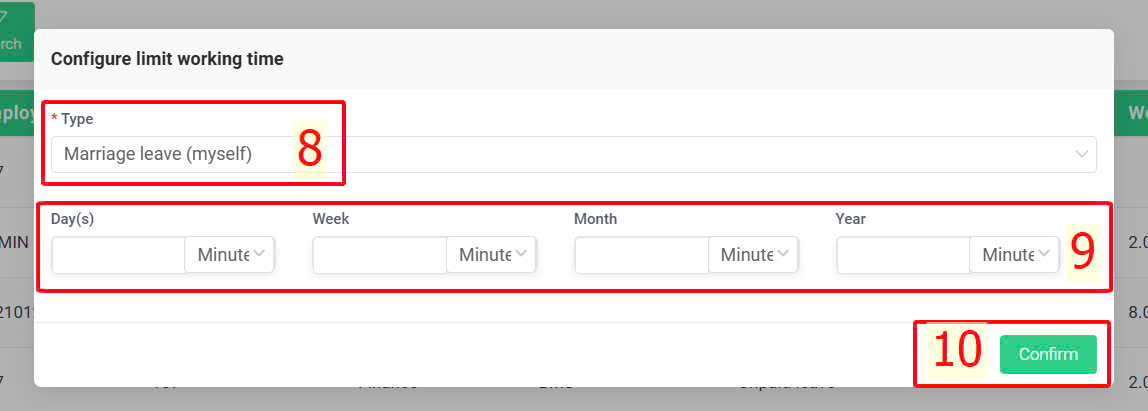
2. Configuration for Each Employee
In case the company has a few employees or many groups of employees with different request time limits, authorized accounts or admin can follow these steps:
Steps:
Company > Settings > Configure limit working time > Employee Tab > Select Employee > Tick to select desired employees > Confirm > Select the request type > Enter the time limit in minutes or hours for each section > Confirm
Note:
-
-
If a time limit has already been set and the employee is selected again, the system will automatically update (overwrite the old limit with the new limit).
-
Personal settings will take priority (override) over company settings.
Example:
The entire company has a 16-hour/week WFH limit while a director has no WFH limit, the admin or authorized accounts can follow these steps:
+ Set the WFH hour limit for the entire company (16-hour/week)
+ Set up for the Director in the [Employee] tab: Leave the weekly WFH hour limit field blank.
In this case, the settings in the [Employee] tab will take precedence over the company-wide settings, and the Director will not be limited in WFH hours for the week.
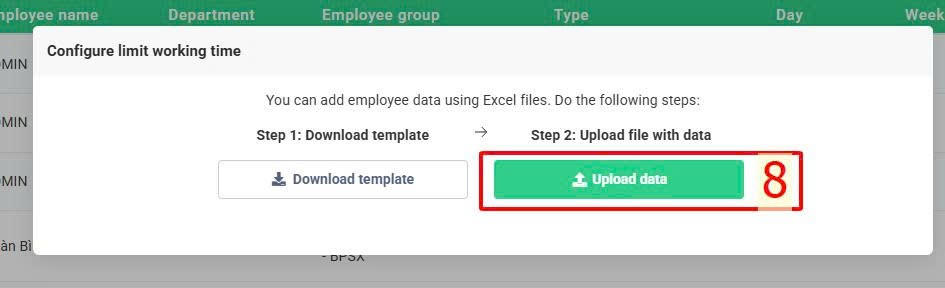
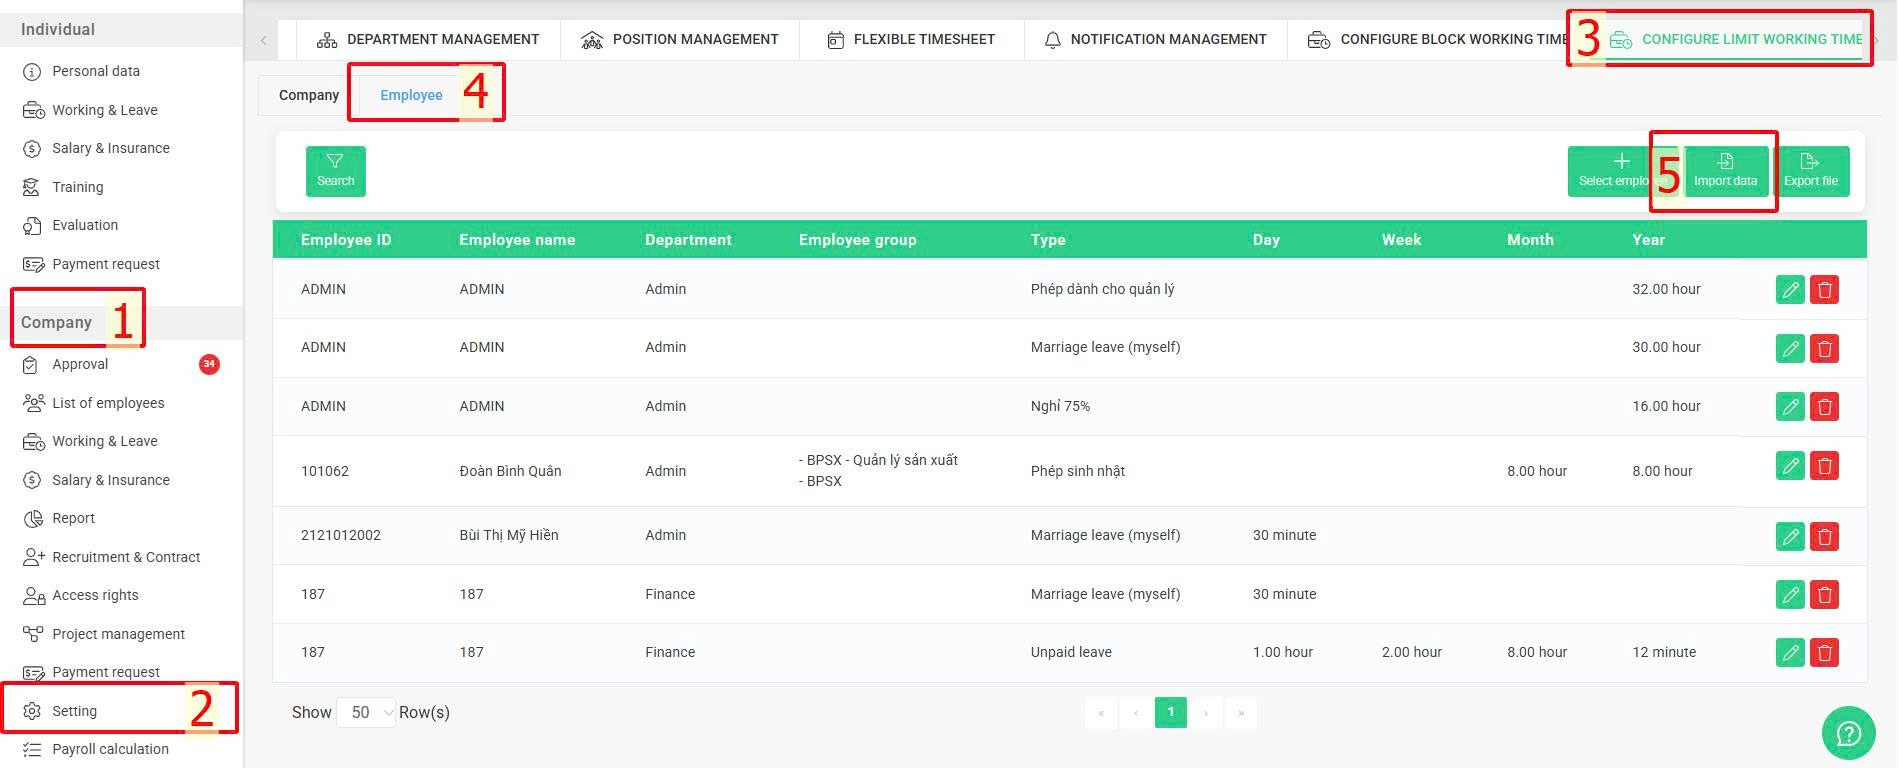
B. Configuration via Excel file import
In case separate settings are needed for multiple employees, instead of configuring each one individually, authorized accounts can fill in the setup parameters in the Excel template and upload it to the system to activate the request hour limits, following the instructions below:
Steps:
Company > Setting > Configure limit working time > Employee > Import data > Download template > Enter data into the file > Upload data


Note:
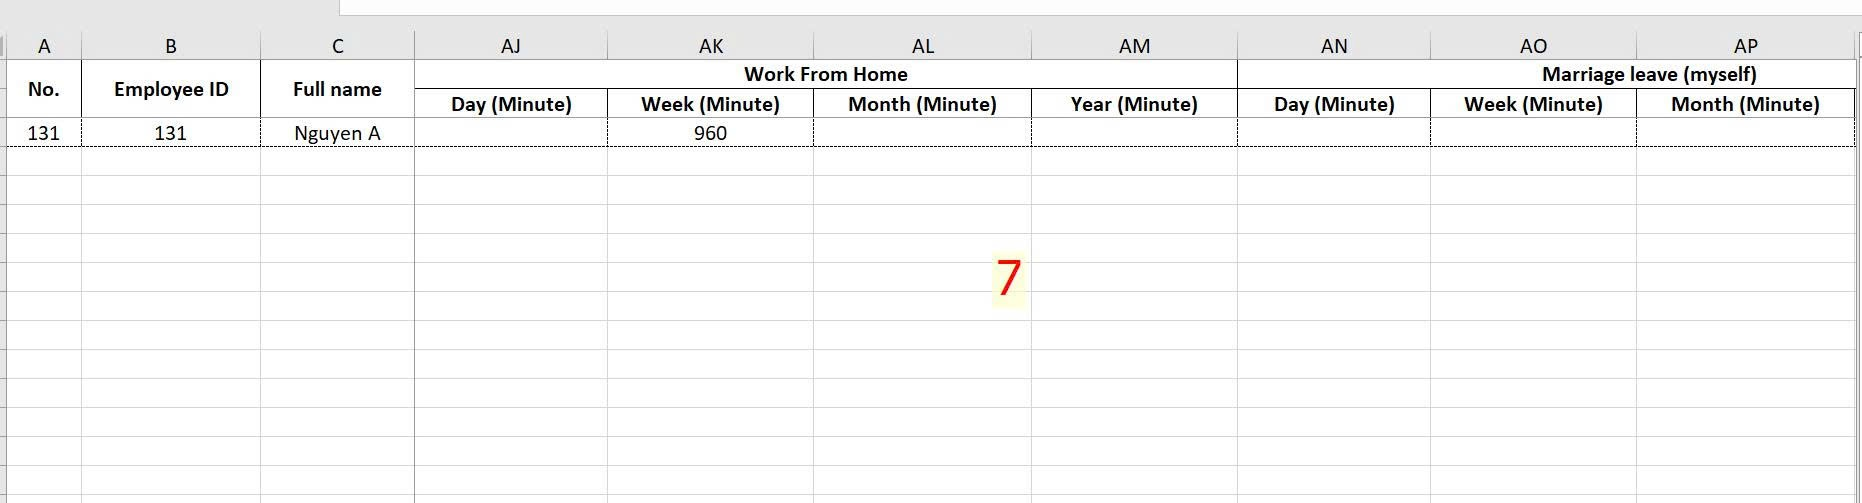
-
For request types that do not require setting or editing limits, make sure to remove them from the template before importing the file into the system. Delete all related items (Day, Week, Month, Year) under those request types.
-
For fields that already have existing data in the system, if you want to keep the current values, you must enter those existing values into the corresponding cells before uploading the file.
-
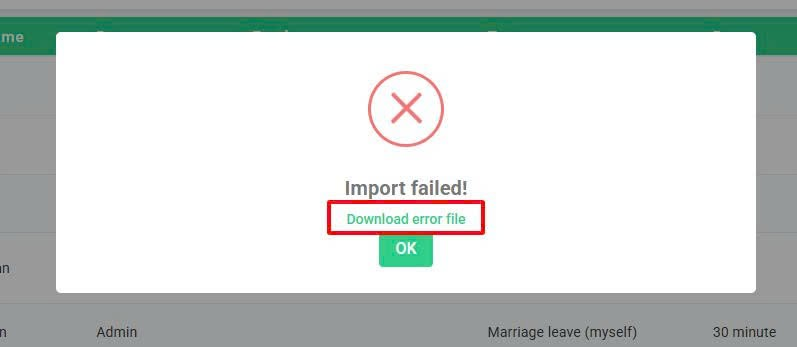
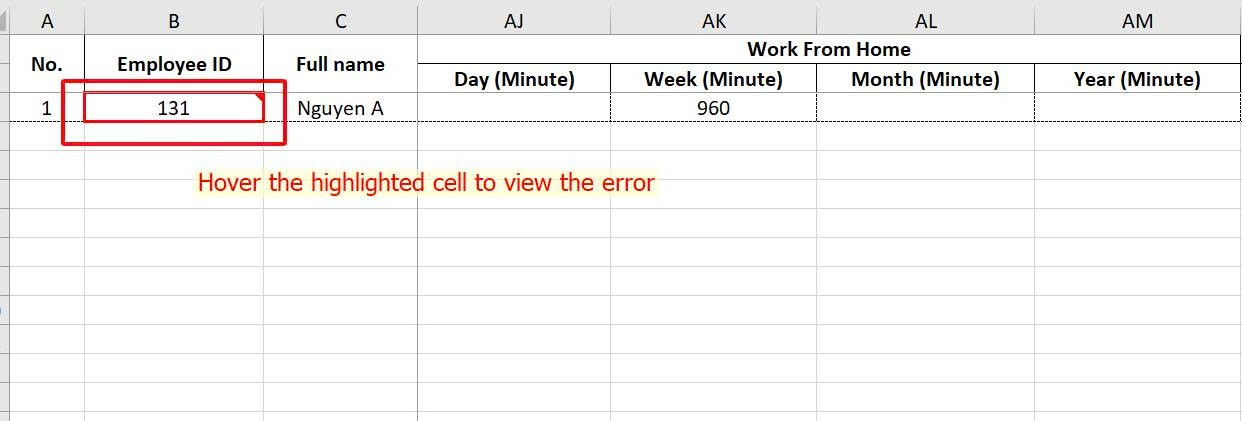
After uploading the file, if any errors are detected, the system will display a notification as shown in the sample image. You can click “Download error file” to download the marked file, correct the errors, and re-upload.

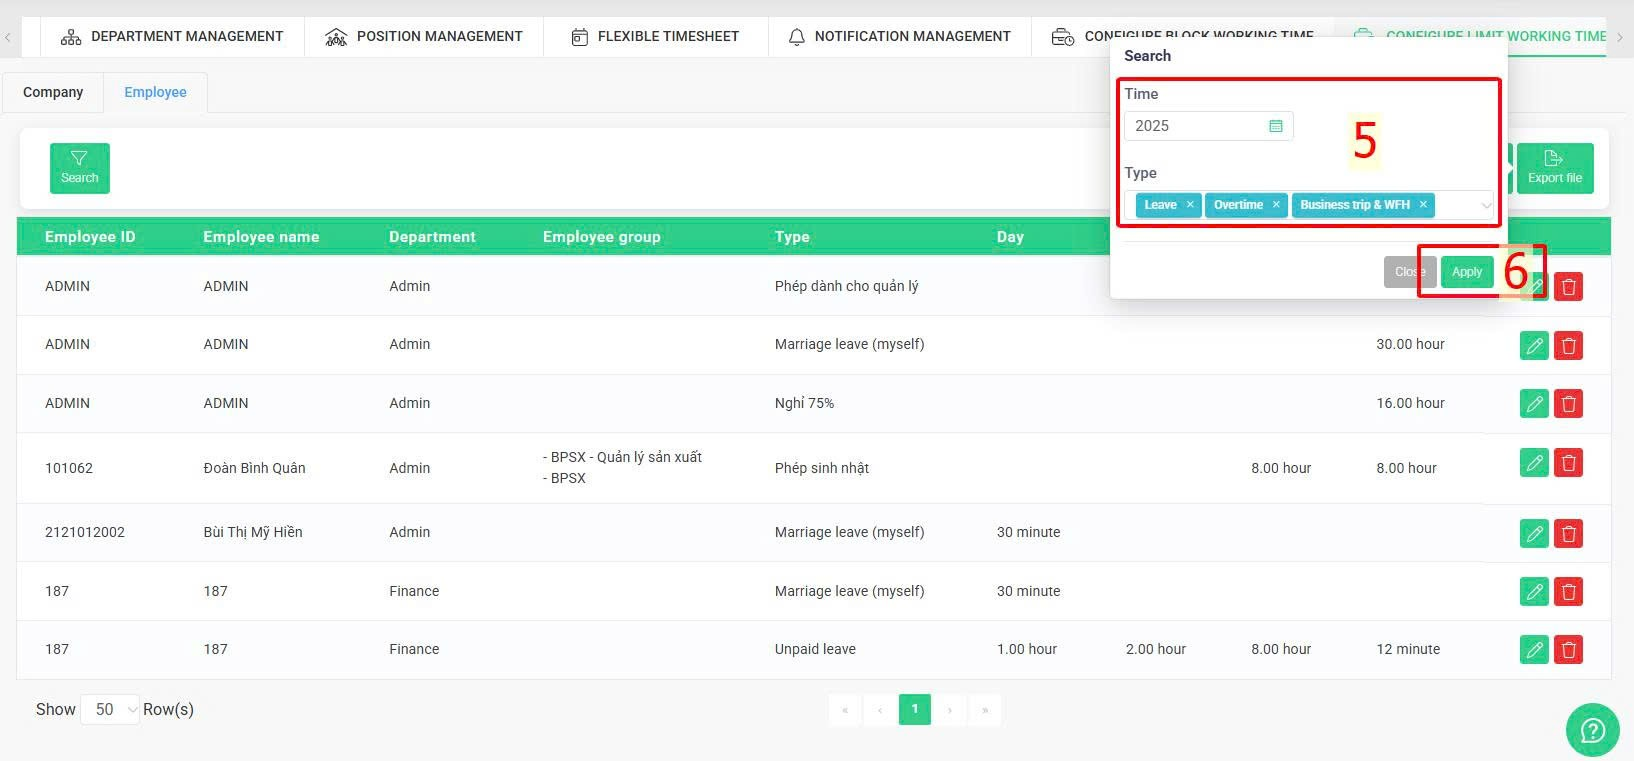
C. View requested time and remaining limit
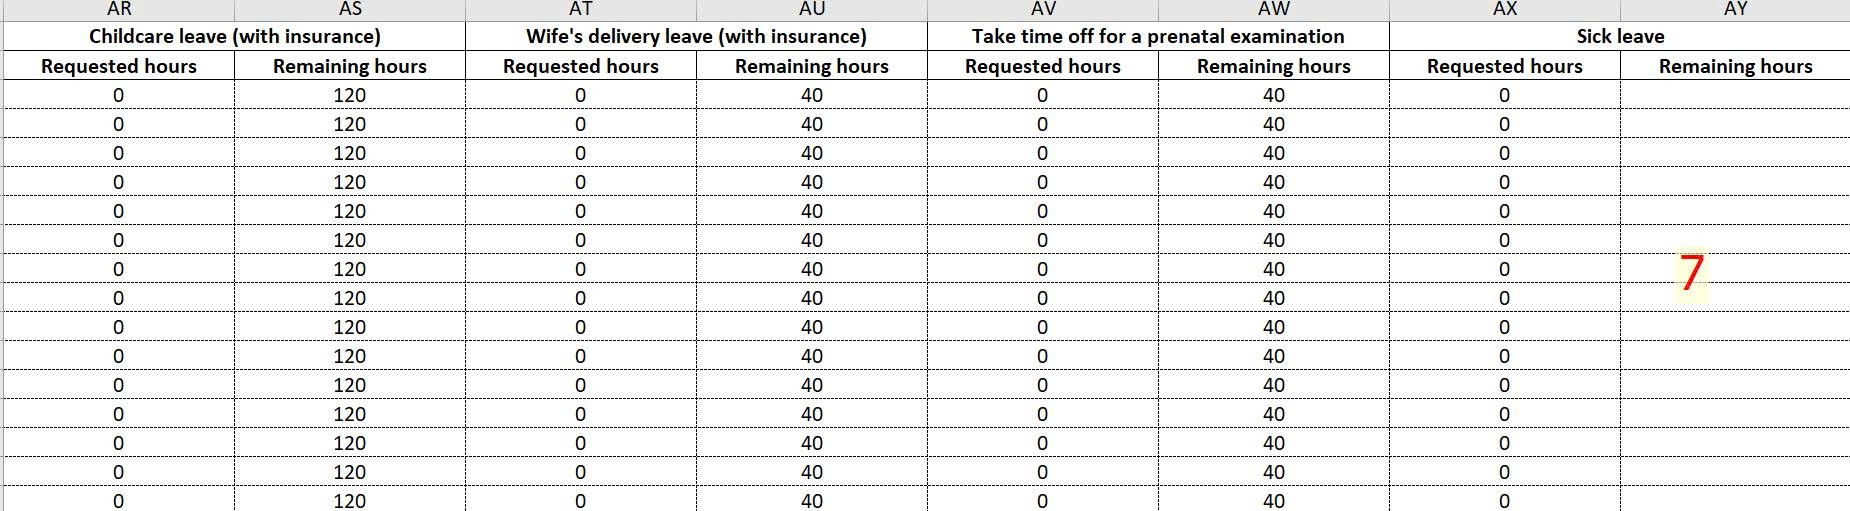
Admin or authorized accounts can view employees' requested time and the remaining limit for each type of requests by follow these steps:
Steps:
Company > Setting > Configure limit working time > Export file > Filter the desired year and type of requests > Apply


Note:
-
Requests with a blank Remaining Hours column are those without a set limit.
-
The data in the file reflects the status at the time of export